Difference between revisions of "Mozilla Thunderbird"
From SupraWiki
Wiki admin (Talk | contribs) m |
|||
| (12 intermediate revisions by 2 users not shown) | |||
| Line 1: | Line 1: | ||
[[category:Email Client Setup]] | [[category:Email Client Setup]] | ||
| + | |||
| + | ==To add a new account to Mozilla Thunderbird== | ||
'''If at any time you don't have the information necessary to complete a step, contact your system administrator or [http://www.supranet.net/contact.php SupraNet] for help.''' | '''If at any time you don't have the information necessary to complete a step, contact your system administrator or [http://www.supranet.net/contact.php SupraNet] for help.''' | ||
| − | + | # Open Mozilla Thunderbird. | |
| + | # If an email account already exists, click on the existing mail account. Navigate to the Accounts section and create a new email account. | ||
| + | # If you are setting up am email account on Thunderbird for the first time, click on the button that allows you to create a new email account. | ||
| + | # Enter your name, full email address, and password. Click Continue. | ||
| + | # '''Thunderbird will try to autodiscover mail settings. Select Manual configuration.''' | ||
| + | #There should be a screen that looks as follows: | ||
| + | <br>[[Image:Thunderbird_2.PNG]]<br><br> | ||
| + | |||
| + | For Incoming mail, | ||
| + | *Define the Incoming protocol to be IMAP | ||
| + | *Enter the server hostnmae | ||
| + | *Enter a port of 143 (110 for POP3) | ||
| + | *Select none for SSL | ||
| + | *Select 'Normal Password' as the Authentication method | ||
| + | *Enter the full email address as the username | ||
| + | <br> | ||
| + | For Outgoing mail, | ||
| + | *Define the Outgoing protocol to be SMTP | ||
| + | *Enter the server hostname | ||
| + | *Enter a port of 587 | ||
| + | *Enter the full email address as the username | ||
| + | <br> | ||
| + | Click Done | ||
| + | <br> | ||
| + | '''''That's it! Your new SupraNet email account is set up. If you received errors during your setup, or if your new mail account doesn't work, please call us at 608.836.0282.''''' | ||
| − | + | '''Note: If you wish to switch from IMAP to POP, you must completely reconfigure the account by going through the whole process again.''' | |
| − | + | ||
| − | + | ||
| − | + | ||
| − | + | ||
| − | + | ||
| − | + | ||
| − | + | ||
| − | + | ||
| − | + | ||
| − | + | ||
| − | + | ||
| − | + | ||
| − | + | ||
| − | + | ||
| − | + | ||
| − | + | ||
| − | + | ||
Latest revision as of 10:32, 10 July 2017
To add a new account to Mozilla Thunderbird
If at any time you don't have the information necessary to complete a step, contact your system administrator or SupraNet for help.
- Open Mozilla Thunderbird.
- If an email account already exists, click on the existing mail account. Navigate to the Accounts section and create a new email account.
- If you are setting up am email account on Thunderbird for the first time, click on the button that allows you to create a new email account.
- Enter your name, full email address, and password. Click Continue.
- Thunderbird will try to autodiscover mail settings. Select Manual configuration.
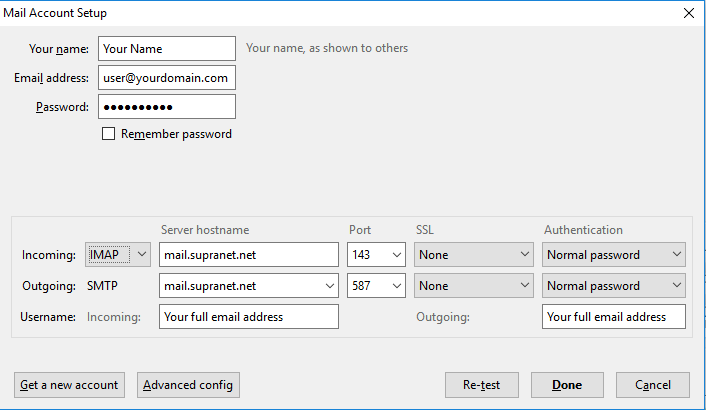
- There should be a screen that looks as follows:
For Incoming mail,
- Define the Incoming protocol to be IMAP
- Enter the server hostnmae
- Enter a port of 143 (110 for POP3)
- Select none for SSL
- Select 'Normal Password' as the Authentication method
- Enter the full email address as the username
For Outgoing mail,
- Define the Outgoing protocol to be SMTP
- Enter the server hostname
- Enter a port of 587
- Enter the full email address as the username
Click Done
That's it! Your new SupraNet email account is set up. If you received errors during your setup, or if your new mail account doesn't work, please call us at 608.836.0282.
Note: If you wish to switch from IMAP to POP, you must completely reconfigure the account by going through the whole process again.
