Difference between revisions of "Windows Mail"
From SupraWiki
Wiki admin (Talk | contribs) |
Wiki admin (Talk | contribs) |
||
| Line 3: | Line 3: | ||
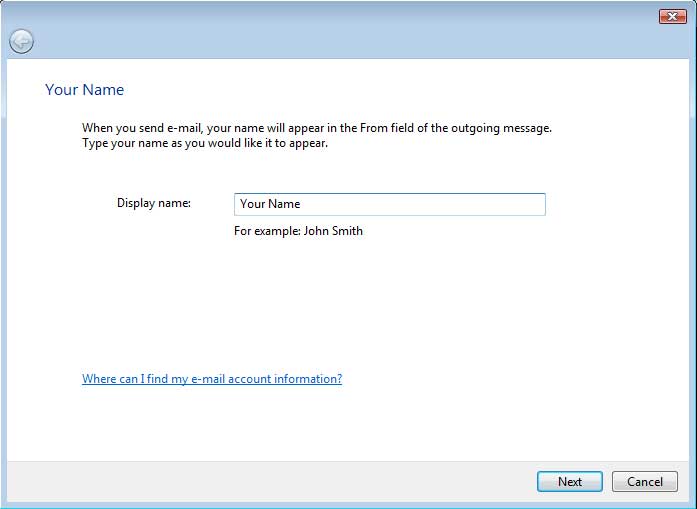
#Enter your name in the '''Display name''' field and click the '''Next''' button.<br/><br/>[[Image:Windows mail 1.jpg]]<br/><br/> | #Enter your name in the '''Display name''' field and click the '''Next''' button.<br/><br/>[[Image:Windows mail 1.jpg]]<br/><br/> | ||
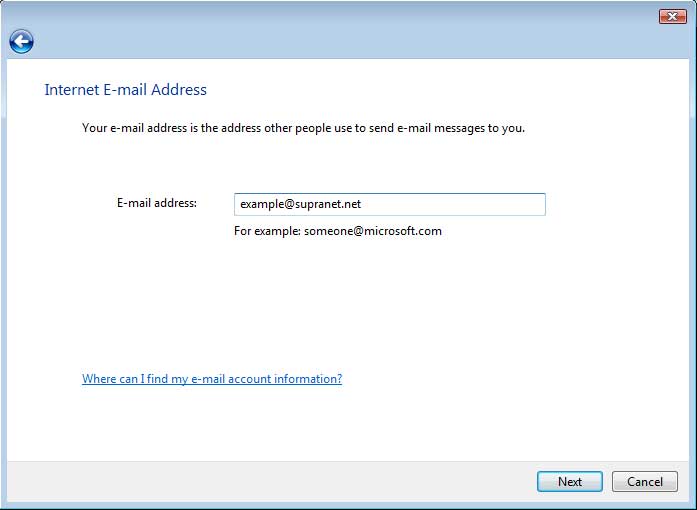
#Enter your email address in the '''E-mail address''' field and click the '''Next''' button.<br/><br/>[[Image:Windows mail 2.jpg]]<br/><br/> | #Enter your email address in the '''E-mail address''' field and click the '''Next''' button.<br/><br/>[[Image:Windows mail 2.jpg]]<br/><br/> | ||
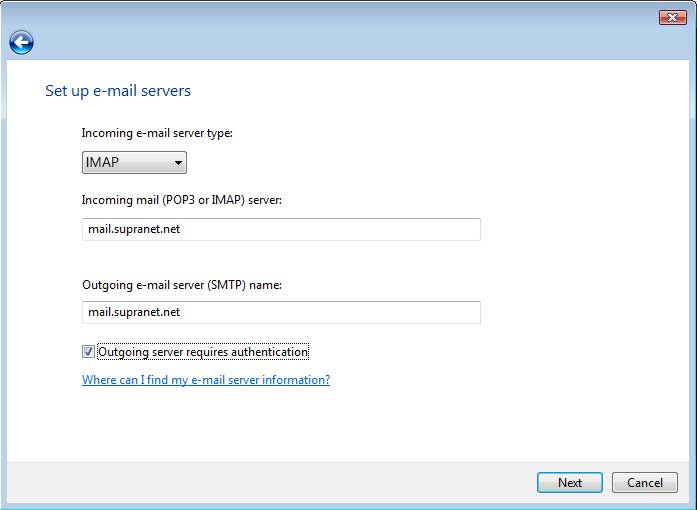
| − | #Enter your mail servers in the fields provided. They are listed as ''mail.supranet.net'' in these examples, but your actual mail servers will probably be '''mail.'''''yourcompany'''''.com'''. (If you don't know your mail server, contact your system administrator or SupraNet Support.) Make sure the "Outgoing server requires authentication" box is checked. Click the '''Next''' button.<br/><br/>[[Image: | + | #Enter your mail servers in the fields provided. They are listed as ''mail.supranet.net'' in these examples, but your actual mail servers will probably be '''mail.'''''yourcompany'''''.com'''. (If you don't know your mail server, contact your system administrator or SupraNet Support.) Make sure the "Outgoing server requires authentication" box is checked. Click the '''Next''' button.<br/><br/>[[Image:Windows_mail_3_2022-03-08.jpg]]<br/><br/> |
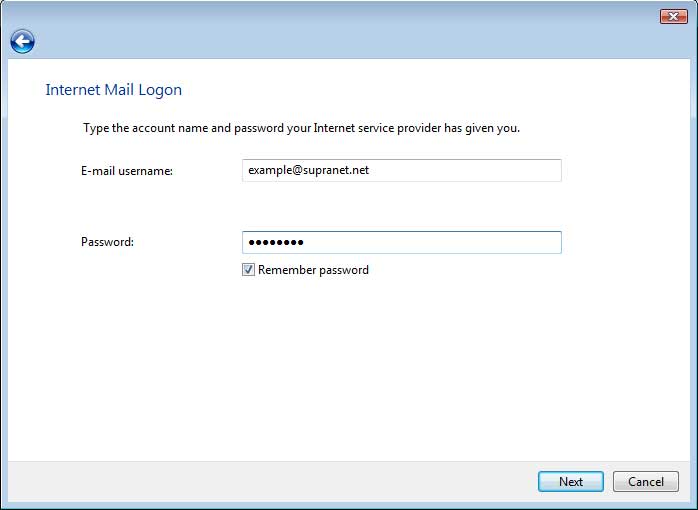
#Enter your username and password. Your username is your full email address, including the ''@yourcompany.com'' portion. Click the '''Next''' button.<br/><br/>[[Image:Windows mail 4.jpg]]<br/><br/> | #Enter your username and password. Your username is your full email address, including the ''@yourcompany.com'' portion. Click the '''Next''' button.<br/><br/>[[Image:Windows mail 4.jpg]]<br/><br/> | ||
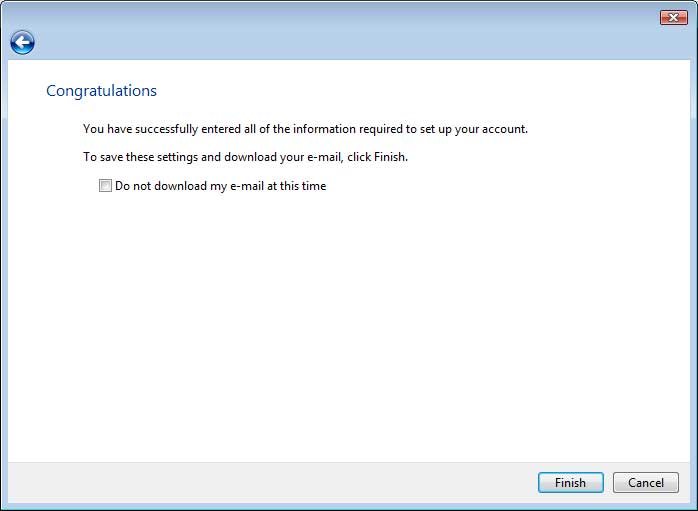
#Click the '''Finish''' button.<br/><br/>[[Image:Windows mail 5.jpg]]<br/><br/> | #Click the '''Finish''' button.<br/><br/>[[Image:Windows mail 5.jpg]]<br/><br/> | ||
Revision as of 14:30, 8 March 2022
- If this is the first time you've opened Windows Mail, you will be immediately prompted by the Add Account wizard. Skip to step 2.
- If you have used Windows Mail before, start Windows Mail, then go to Tools in the menu bar, then Accounts in the dropdown, and click the Add... button. Select E-mail Account from the list of account types, and click the Next button.
- Enter your name in the Display name field and click the Next button.
- Enter your email address in the E-mail address field and click the Next button.
- Enter your mail servers in the fields provided. They are listed as mail.supranet.net in these examples, but your actual mail servers will probably be mail.yourcompany.com. (If you don't know your mail server, contact your system administrator or SupraNet Support.) Make sure the "Outgoing server requires authentication" box is checked. Click the Next button.
- Enter your username and password. Your username is your full email address, including the @yourcompany.com portion. Click the Next button.
- Click the Finish button.
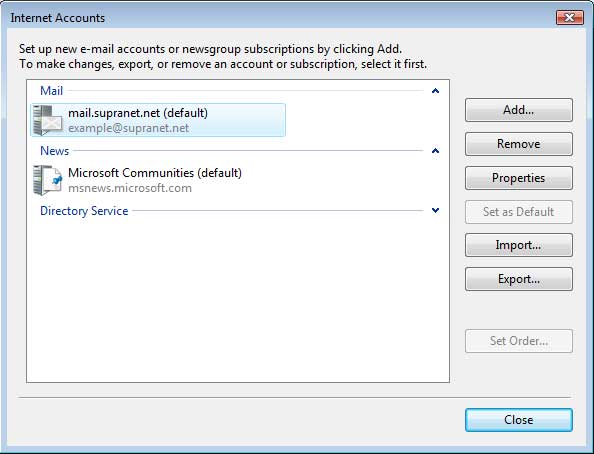
- If you're finishing the Add Account wizard for the first time, Windows Mail will download SupraNet's welcome message and drop you at the home screen. From there, go to Tools in the menu bar, then Accounts in the dropdown. If this is not the first time you've run Windows Mail, skip to the next step.
- Double click the newly-created SupraNet account in the accounts list. This brings up the account's properties.
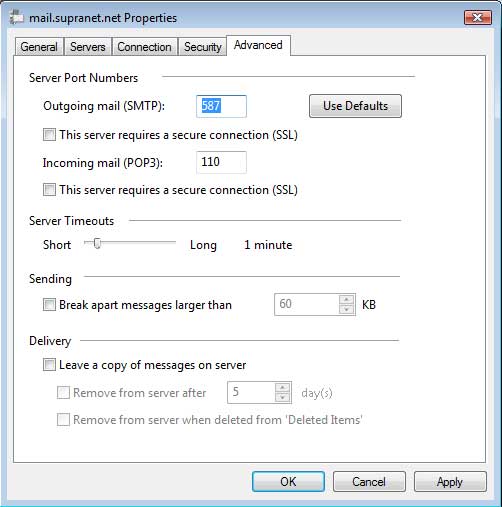
- Click on the Advanced tab. In the Outgoing mail (SMTP) field, delete 25 and enter 587, as shown. Click OK.
- Click the Close button. Your account setup is complete.


