Difference between revisions of "IOS6"
From SupraWiki
Wiki admin (Talk | contribs) (Created page with "Follow these steps to add a new email account to Apple iOS 6 (iPhone, iPad, iPod): # Tap Settings > Mail, Contacts, Calendars > Add Account > Other.<br>[[Image:IOS6-email-01....") |
Wiki admin (Talk | contribs) |
||
| Line 1: | Line 1: | ||
Follow these steps to add a new email account to Apple iOS 6 (iPhone, iPad, iPod): | Follow these steps to add a new email account to Apple iOS 6 (iPhone, iPad, iPod): | ||
| − | # Tap Settings > Mail, Contacts, Calendars > Add Account > Other.<br>[[Image:IOS6-email-01.PNG|200px]] | + | # Tap Settings > Mail, Contacts, Calendars > Add Account > Other.<br>[[Image:IOS6-email-01.PNG|200px]]<br><br> |
| − | + | # Tap Add Mail Account.<br><br> | |
| − | + | # Enter your name as you want it to appear on your outgoing email for '''Name'''. Enter your email address for '''Email'''. Enter your email password for '''Password'''. (If you don't have this information, please [http://supranet.net/contact.php contact SupraNet] or your network administrator for assistance.) Enter a description of this account in '''Description''' if you wish. Tap '''Next'''.<br>[[Image:IOS6-email-02.PNG|200px]]<br><br> | |
| − | + | # Make sure that '''IMAP''' is selected. '''Name''', '''Email''', and '''Description''' will already be filled in from the previous screen. Scroll down.<br>[[Image:IOS6-email-03.PNG|200px]]<br><br> | |
| − | + | # In the Incoming Mail Server section, enter your incoming mail server for '''Host Name''' and enter your full email address for '''User Name'''. (The '''Password''' should already be filled in from the previous screen.) Scroll down.<br>[[Image:IOS6-email-04.PNG|200px]]<br><br> | |
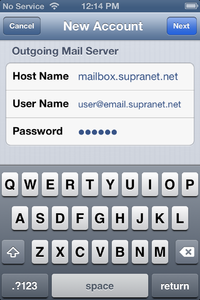
| − | # | + | # In the Outgoing Mail Server section, enter your outgoing mail server for '''Host Name''' and enter your full email address for '''User Name'''. (The '''Password''' should already be filled in from the previous screen.) Tap '''Next'''.<br>[[Image:IOS6-email-05.PNG|200px]]<br><br> |
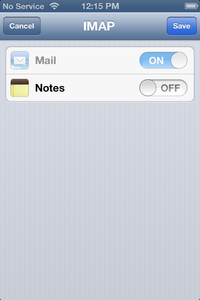
| − | # Enter your name as you want it to appear on your outgoing email for ''' | + | # Make sure that Mail is '''On'''. You can leave Notes on if you wish. Tap '''Save'''.<br>[[Image:IOS6-email-06.PNG|200px]]<br><br> |
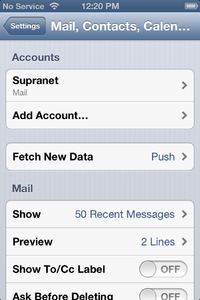
| − | # | + | # You will be back at the Mail, Contacts, Calendars screen. Tap the account you just created.<br>[[Image:IOS6-email-07.PNG|200px]]<br><br> |
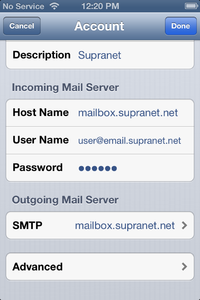
| − | # | + | # In the IMAP section, tap the account you just created.<br>[[Image:IOS6-email-08.PNG|200px]]<br><br> |
| − | # | + | # Scroll down to the Outgoing Mail Server section and tap the SMTP server.<br>[[Image:IOS6-email-10.PNG|200px]]<br><br> |
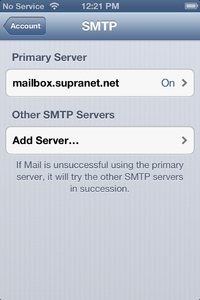
| − | # | + | # Tap the server listed in the Primary Server section.<br>[[Image:IOS6-email-11.PNG|200px]]<br><br> |
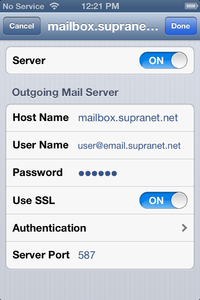
| − | # | + | # Verify your full email address for '''User Name''', Use SSL is on, Authentication is '''Password''', and Server Port is '''587'''. Tap '''Done'''.<br>[[Image:IOS6-email-12.PNG|200px]]<br><br> |
| − | # | + | # That's it! Your new SupraNet email account is set up. If you received errors during your setup, or your new mail account doesn't work, please [http://supranet.net/contact.php contact SupraNet].<br><br> |
| − | # | + | |
| − | # | + | |
| − | + | ||
| − | # That's it! Your new SupraNet email account is set up. If you received errors during your setup, or your new mail account doesn't work, please [http://supranet.net/contact.php contact SupraNet]. | + | |
| − | + | ||
[[category:Email Client Setup]] | [[category:Email Client Setup]] | ||
Latest revision as of 14:30, 23 January 2013
Follow these steps to add a new email account to Apple iOS 6 (iPhone, iPad, iPod):
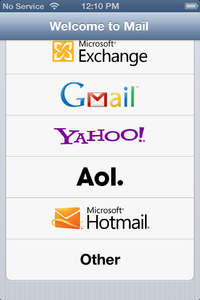
- Tap Settings > Mail, Contacts, Calendars > Add Account > Other.
- Tap Add Mail Account.
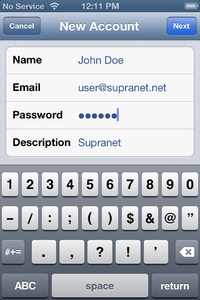
- Enter your name as you want it to appear on your outgoing email for Name. Enter your email address for Email. Enter your email password for Password. (If you don't have this information, please contact SupraNet or your network administrator for assistance.) Enter a description of this account in Description if you wish. Tap Next.
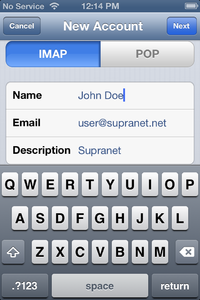
- Make sure that IMAP is selected. Name, Email, and Description will already be filled in from the previous screen. Scroll down.
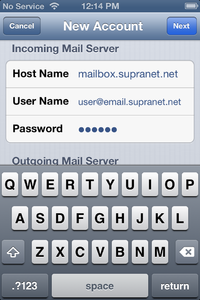
- In the Incoming Mail Server section, enter your incoming mail server for Host Name and enter your full email address for User Name. (The Password should already be filled in from the previous screen.) Scroll down.
- In the Outgoing Mail Server section, enter your outgoing mail server for Host Name and enter your full email address for User Name. (The Password should already be filled in from the previous screen.) Tap Next.
- Make sure that Mail is On. You can leave Notes on if you wish. Tap Save.
- You will be back at the Mail, Contacts, Calendars screen. Tap the account you just created.
- In the IMAP section, tap the account you just created.

- Scroll down to the Outgoing Mail Server section and tap the SMTP server.
- Tap the server listed in the Primary Server section.
- Verify your full email address for User Name, Use SSL is on, Authentication is Password, and Server Port is 587. Tap Done.
- That's it! Your new SupraNet email account is set up. If you received errors during your setup, or your new mail account doesn't work, please contact SupraNet.


